Do you ever have problems with wavy borders? That Crazy Quilty Girl steps you through a great way to add borders to your quilt. I'm going to try it her way on my next quilt. I've never had really obvious problems, but my last quilt had a bit of extra fabric along the right edge - I had to ease that in as I quilted. I was lucky that I was able to do it without any dreaded puckers!
[sorry, no photos tonight. I'm supposed to be working on a little photoshop project, but got distracted by looking at awesome quilts. Ok. Back to work.]

Wednesday, March 30, 2011
Friday, March 25, 2011
My Little Trick
I’ve had this quilt in my “favorites” for awhile now, and today I pulled some fabric from my stash to make a similar quilt. The squares are cut at 6” and the rectangles are cut at 3” x 6”.
I got everything cut out rather quickly, but then started to worry about the gray squares I had added. I put it up on the design wall and stood back to look at it. Still not sure about it.

So I replaced the gray squares with the umbrella print and (again) stood back to take a look. I had mixed feelings about them both. So then I pulled out my camera. This is a little trick I use when I can’t decide about a quilt layout - I take photos of the quilt on the design wall and then go and look at them on my computer. There’s something about doing it that way that helps give a bit of perspective or something. It helps me to step back and get a good look at how everything is working (or not working!) together.

After photographing both layout options and then viewing them on my computer I have a definite favorite. I won’t say which one, because I’m curious if any of you have a preference? Any thoughts?
Oh and FYI, where you see white (from my wall) that will be white fabric.
I got everything cut out rather quickly, but then started to worry about the gray squares I had added. I put it up on the design wall and stood back to look at it. Still not sure about it.
[quilt layout option #1]
So I replaced the gray squares with the umbrella print and (again) stood back to take a look. I had mixed feelings about them both. So then I pulled out my camera. This is a little trick I use when I can’t decide about a quilt layout - I take photos of the quilt on the design wall and then go and look at them on my computer. There’s something about doing it that way that helps give a bit of perspective or something. It helps me to step back and get a good look at how everything is working (or not working!) together.
[quilt layout option #2]
After photographing both layout options and then viewing them on my computer I have a definite favorite. I won’t say which one, because I’m curious if any of you have a preference? Any thoughts?
Oh and FYI, where you see white (from my wall) that will be white fabric.
Monday, March 21, 2011
Mad for Plaid
All finished!

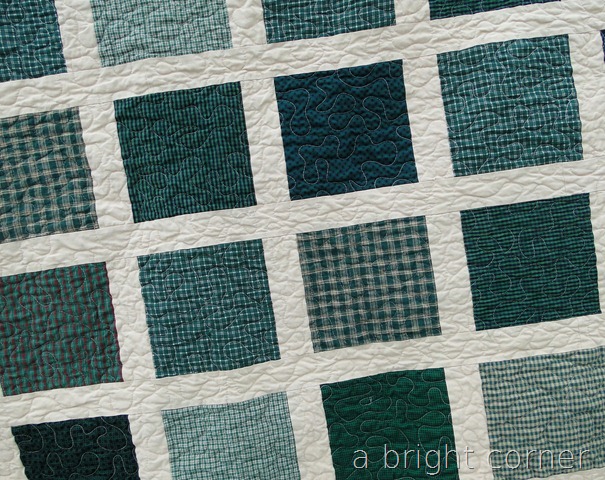
Last Summer I spotted this stack of green plaid fabrics at a garage sale. I was able to cut many, (MANY!) 8-inch squares from that stack and thought they would look great paired with some Kona Khaki.
This quilt finished at a large twin size – almost a full. It was the first official quilt I quilted on my new Grace Pinnacle frame and I’m super happy with how it turned out. No more crawling on the floor to baste quilts! hooray!

One of my big concerns was having the green fabrics bleed onto the khaki in the wash, but it did great! The backing is solid Khaki – so boring that I didn’t bother photographing it. The binding is a green plaid as well. This quilt is on it’s way to my church’s Humanitarian Center. I saw here that they are need of quilts – and that’s one thing I can do!
Sunday, March 20, 2011
A New Toy
She’s finally up and running! After some trial and error regarding thread (a lot of breaking threads, and me nearly tearing my hair out) I am finally able to use my new quilting frame.

I’m absolutely in love with my sewing machine. For years I’ve been using a small-ish Brother that I bought from Costco. It worked beautifully and did nearly everything I pushed it to do. All of my quilts up to this point were sewn AND quilted on that little workhorse. She’s been put out to pasture now though, only to be called upon for a random button hole or two.
I’ve moved up to the Juki TL-2010Q and the speed is amazing. The first time stitched at full speed I laughed out loud. I think my kids thought I had gone insane. Yes, it was THAT kind of laugh.
Just in case anyone else has thread breakage issues with their Juki – the thread I found that worked the best is Signature. One local quilt shop recommended Star brand but it was the worst of all of them. So I guess I’m a Signature girl now!
Saturday, March 19, 2011
Robots
Boy #2 moved to a big boy bed no too long ago and was in need of a big boy quilt. I bought this robot fabric a LONG time ago and held on to it, hoping that I could use it in his quilt at some point.

The fabric was originally part of a quilt kit that I purchased from American Quilting (is this one of your kits Amy?). The kit was for a crib size, so I added a bit more to make it a twin size. I had to add in the greens so it would somewhat match what was already in his bedroom, and then I also changed the stripey binding to a stripe that had some green in it. (I really do have a weakness for a nice striped fabric.)

I love the robots, but I think my son likes the rocket ships more!
For the backing I used up what was left from the robots & rockets fabric and then added stripes of some Kona solids I had in my stash. I have to say it’s not my favorite backing that I’ve done!

Now my not-so-little boy has his own big boy quilt. I think that two of the most rewarding quilts I’ve created are the two I’ve done for my boys. There’s just something about seeing them snuggle up in it while they sleep.
The fabric was originally part of a quilt kit that I purchased from American Quilting (is this one of your kits Amy?). The kit was for a crib size, so I added a bit more to make it a twin size. I had to add in the greens so it would somewhat match what was already in his bedroom, and then I also changed the stripey binding to a stripe that had some green in it. (I really do have a weakness for a nice striped fabric.)
I love the robots, but I think my son likes the rocket ships more!
For the backing I used up what was left from the robots & rockets fabric and then added stripes of some Kona solids I had in my stash. I have to say it’s not my favorite backing that I’ve done!
Now my not-so-little boy has his own big boy quilt. I think that two of the most rewarding quilts I’ve created are the two I’ve done for my boys. There’s just something about seeing them snuggle up in it while they sleep.
Subscribe to:
Comments (Atom)
